
Here's a fun little snowman guy you can make
and turn into a pin, hair clip or ornament!

What you'll need:

What you'll need:
3/8" grosgrain ribbon in white, black, red, brown, and orange
scissors
lighter
black craft paint
pearl topped straight pin
ribbon covered hair clip
glue gun
Step One:
Cut your ribbon into the following lengths.

Step Two:
Using your lighter, heat seal all of your cut edges to prevent fraying. You can also use a wood burning tool - it will cut and seal your ribbon at the same it. It's awesome!

Step Three:
Slightly overlap the edges of the 2.75" ribbon piece for the body to create a circle.
Step Four:
Repeat with the 2.5" body pieces so you'll have 3 circles.
I make second 2.5" piece slightly smaller than the first, so that they will fit snugly inside of each other in the next step.
Step Five:
Take the larger of your 2.5" body pieces and slide it into the 2.75" circle body piece, matching the seams. Secure with a dab of hot glue in the back at the seams and in the front by slightly pulling the 2.5" circle out, dabbing with glue, and slipping back into place.
Step Six:
Insert the smaller 2.5" body piece into the two-stacked body and secure with glue the same way.

Now you have your body! Onto the head!
Step Seven:
Repeat what you did in Step Three and make the two pieces for the head into circles - roughly the same size. Then, slightly flatten them, careful not to crease the edges and slip them inside of one another - forming an "X".

Step Eight:
Secure with glue on both sides of your "X" where they "cross" one another.
Step Nine:
And now you have your head! If you were careful not to crease your edges when forming your "X" - it should pop up like this.
Now we'll give that headless little snowman body his head.
Step Ten:
Set the snowman head on top of the body. I like the "inside" circle to face forward and be my face, but you can place it however you think looks best.
Now secure with glue in the back where the seams of the body are by put a dab of glue at the top of the body seams and holding the head there until it cools.
Step Eleven:
Then flip it up and place glue where the arrows in the following photo indicate. Then gently press the head down and hold until the glue cools.

Step Twelve:
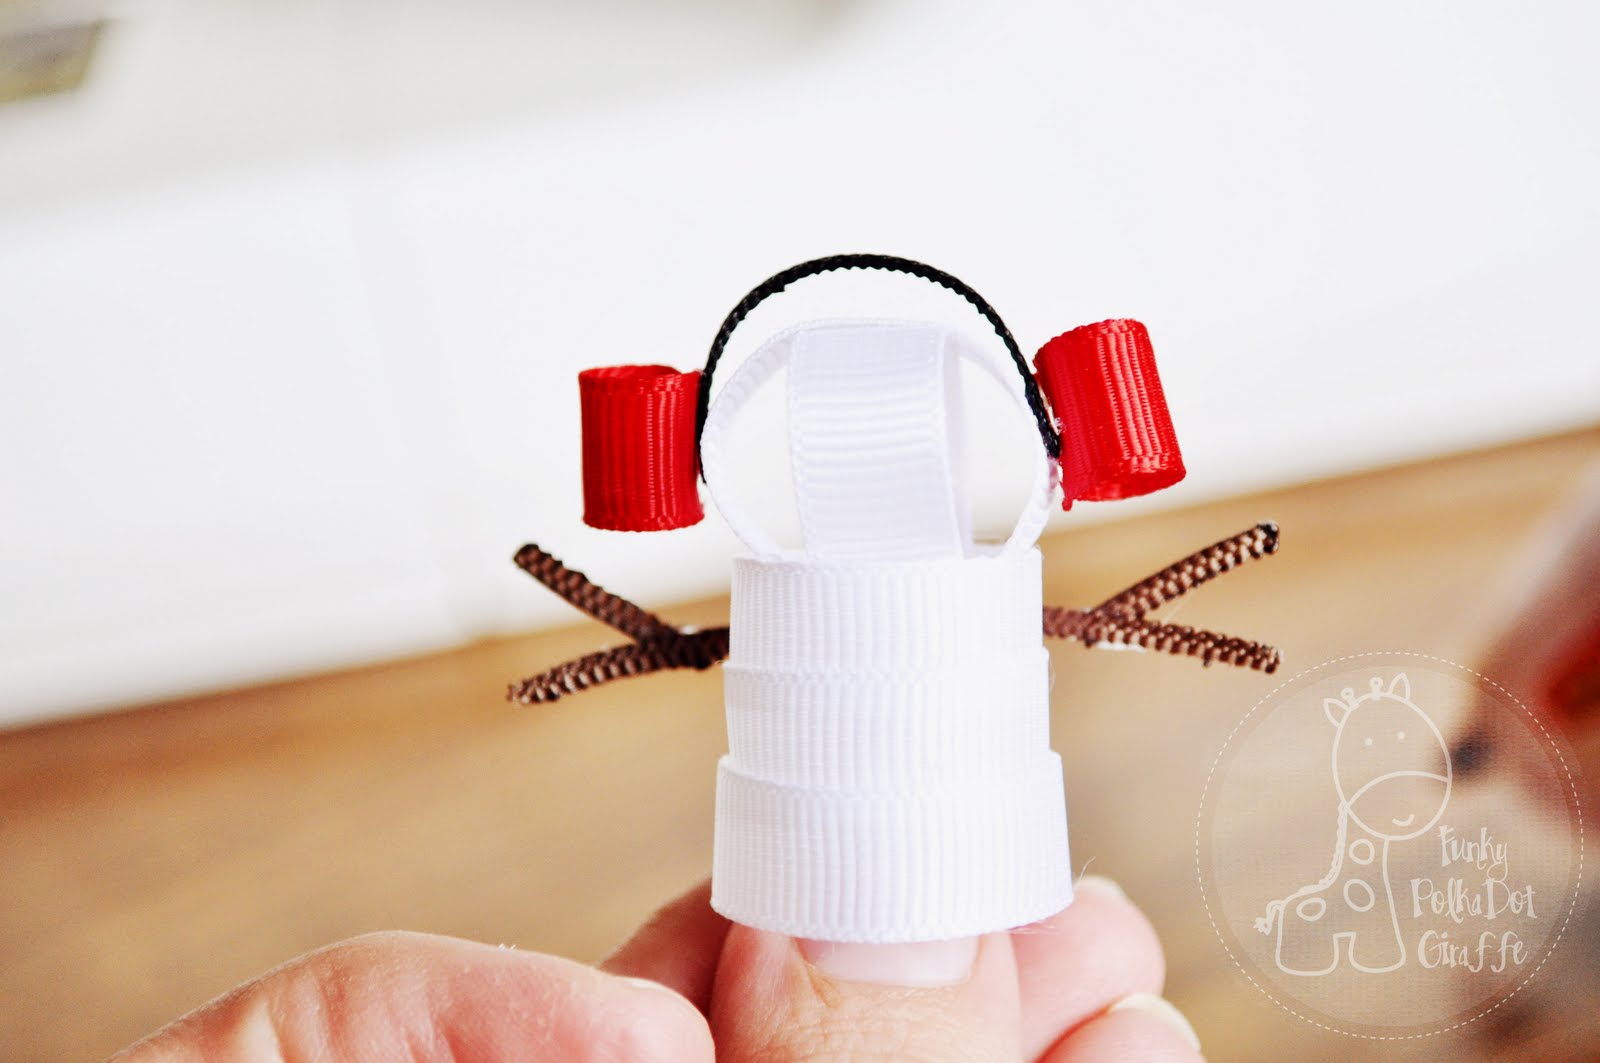
12A & 12B: Take your 1.5" black piece from the hear muffs, and clip closely to the seam, so that you have a piece that is about 1/16" wide. Heat seal the cut edge.
Step Thirteen:
13A: With your 1" red pieces, create two similarly sized tubes for the ear muffs. I like to use one of my wooden dowels from korker making to keep the edge in place while I glue it together. And it helps keep them the same size.
13B: Now you have all the pieces for your tiny snowman ear muffs!

Step Fourteen:
14A: About half way down the side of the head, secure one piece of the headband portion of the ear muffs with a dab of glue.
14B: Repeat with the second side.
Step Fifteen:
15A: With the back of your snowman facing you, so you can see the seams, take one ear muff and position it so that the seam is coming toward you and the body seams. Secure the ear muff with a dab of glue so the ear muff seam is slightly more toward the back than the front.
15B: Repeat process with the second ear muff.

Step Sixteen:
16A: Now, just like you did in Step Nine, take your 2" brown piece and clip closely to the seam for a 1/16" to an 1/8" wide piece, but do it on both edges, so that you have two pieces. Heat seal the cut edges.
16B: Then clip two 1/2" pieces from one of the 2" pieces, heat seal the cut edges.
Step Seventeen:
Position the 1/2" pieces at opposite ends of the 2" arm piece - making little snowman stick hands - and secure with dabs of hot glue.
Step Eighteen:
With the back of the snowman facing you, put a dab of hot glue on the top body section and secure the arms to the back. I like the "hands" to point up.

Now our little snowman just needs his face!

Step Nineteen:
19A: Take your 1" orange piece and fold it in half, securing it with a dab of glue along the open, heat sealed edges.
19B: Then, cut down the 1" piece, about a 1/3 of the way over from the edge and heat seal the cut edge.
19C: Put a dab of hot glue on the edge of the nose and position on the face.
19D: Now he needs eyes! You can use googly eyes - like I do on my turkeys - but I prefer painting on the eyes for the snowman. Take your black craft paint, a piece of paper (or paper plate) and your straight pin and get ready to paint some eyes!

Step Twenty:
20A: Pour a teensy amount of black paint out onto a piece of paper, and dab your the pearl end of your pin into the glue. I then dab once onto the paper and then onto the snowman - creating an eye. Repeat the process for the second eye.
20B: Now your snowman has a face! Holla!
Now at this point you can turn him into a pin, an ornament or a hair clip. We're going to make him into a hair clip today.
Step Twenty-One:
21A: Take your ribbon covered hair clip and put a line of glue from the end that opens, right up to the point where the clip bends. Don't glue where you pinch to open the clip.
21B: Then secure your snowman to the clip with the bottom of the snowman butting up to bottom edge of your line of glue.

He's done! Now if you want him to have a girlfriend, just make a bow instead of the ear muffs!

scissors
lighter
black craft paint
pearl topped straight pin
ribbon covered hair clip
glue gun
Step One:
Cut your ribbon into the following lengths.

Step Two:
Using your lighter, heat seal all of your cut edges to prevent fraying. You can also use a wood burning tool - it will cut and seal your ribbon at the same it. It's awesome!

Step Three:
Slightly overlap the edges of the 2.75" ribbon piece for the body to create a circle.
Step Four:
Repeat with the 2.5" body pieces so you'll have 3 circles.
I make second 2.5" piece slightly smaller than the first, so that they will fit snugly inside of each other in the next step.
Step Five:
Take the larger of your 2.5" body pieces and slide it into the 2.75" circle body piece, matching the seams. Secure with a dab of hot glue in the back at the seams and in the front by slightly pulling the 2.5" circle out, dabbing with glue, and slipping back into place.
Step Six:
Insert the smaller 2.5" body piece into the two-stacked body and secure with glue the same way.

Now you have your body! Onto the head!
Step Seven:
Repeat what you did in Step Three and make the two pieces for the head into circles - roughly the same size. Then, slightly flatten them, careful not to crease the edges and slip them inside of one another - forming an "X".

Step Eight:
Secure with glue on both sides of your "X" where they "cross" one another.
Step Nine:
And now you have your head! If you were careful not to crease your edges when forming your "X" - it should pop up like this.
Now we'll give that headless little snowman body his head.
Step Ten:
Set the snowman head on top of the body. I like the "inside" circle to face forward and be my face, but you can place it however you think looks best.
Now secure with glue in the back where the seams of the body are by put a dab of glue at the top of the body seams and holding the head there until it cools.
Step Eleven:
Then flip it up and place glue where the arrows in the following photo indicate. Then gently press the head down and hold until the glue cools.

Step Twelve:
12A & 12B: Take your 1.5" black piece from the hear muffs, and clip closely to the seam, so that you have a piece that is about 1/16" wide. Heat seal the cut edge.
Step Thirteen:
13A: With your 1" red pieces, create two similarly sized tubes for the ear muffs. I like to use one of my wooden dowels from korker making to keep the edge in place while I glue it together. And it helps keep them the same size.
13B: Now you have all the pieces for your tiny snowman ear muffs!

Step Fourteen:
14A: About half way down the side of the head, secure one piece of the headband portion of the ear muffs with a dab of glue.
14B: Repeat with the second side.
Step Fifteen:
15A: With the back of your snowman facing you, so you can see the seams, take one ear muff and position it so that the seam is coming toward you and the body seams. Secure the ear muff with a dab of glue so the ear muff seam is slightly more toward the back than the front.
15B: Repeat process with the second ear muff.

Step Sixteen:
16A: Now, just like you did in Step Nine, take your 2" brown piece and clip closely to the seam for a 1/16" to an 1/8" wide piece, but do it on both edges, so that you have two pieces. Heat seal the cut edges.
16B: Then clip two 1/2" pieces from one of the 2" pieces, heat seal the cut edges.
Step Seventeen:
Position the 1/2" pieces at opposite ends of the 2" arm piece - making little snowman stick hands - and secure with dabs of hot glue.
Step Eighteen:
With the back of the snowman facing you, put a dab of hot glue on the top body section and secure the arms to the back. I like the "hands" to point up.

Now our little snowman just needs his face!
Step Nineteen:
19A: Take your 1" orange piece and fold it in half, securing it with a dab of glue along the open, heat sealed edges.
19B: Then, cut down the 1" piece, about a 1/3 of the way over from the edge and heat seal the cut edge.
19C: Put a dab of hot glue on the edge of the nose and position on the face.
19D: Now he needs eyes! You can use googly eyes - like I do on my turkeys - but I prefer painting on the eyes for the snowman. Take your black craft paint, a piece of paper (or paper plate) and your straight pin and get ready to paint some eyes!

Step Twenty:
20A: Pour a teensy amount of black paint out onto a piece of paper, and dab your the pearl end of your pin into the glue. I then dab once onto the paper and then onto the snowman - creating an eye. Repeat the process for the second eye.
20B: Now your snowman has a face! Holla!

Now at this point you can turn him into a pin, an ornament or a hair clip. We're going to make him into a hair clip today.
Step Twenty-One:
21A: Take your ribbon covered hair clip and put a line of glue from the end that opens, right up to the point where the clip bends. Don't glue where you pinch to open the clip.
21B: Then secure your snowman to the clip with the bottom of the snowman butting up to bottom edge of your line of glue.

He's done! Now if you want him to have a girlfriend, just make a bow instead of the ear muffs!


7 comments:
This is too cute! I am definitely making one (or two) for my girls! Thanks for sharing!
That's adorable! My little ones would love it.
How much fun is this!!! i love it!! Super cute! =)
Super cute!
So cute! I'm going to have to try this out and bribe my daughter to wear something in her hair!
I'd love for you to link up and share: http://tutusandteaparties.blogspot.com/2012/01/pinteresting-party-number-twenty-three.html
This is such a cute idea -and a wonderfully clear tutorial!
I would love if you came over and linked this project to my weekly Round Tuit party at:
http://jembellish.blogspot.com/
Have a great week!
Jill @ Creating my way to Success
this is soooooo adorable! thanks for sharing and i am so sorry i double clicked something???? did not mean to double post -- many apologies...your newest follower : ) hugs
Post a Comment