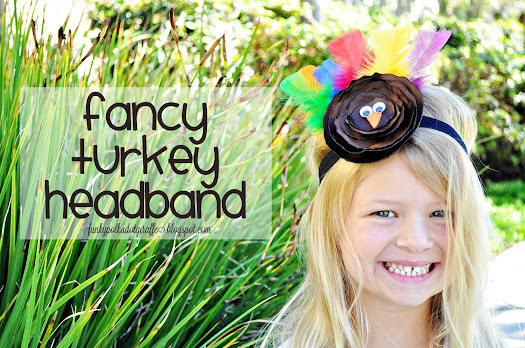
It's turkey week (aka Thanksgiving) and so it's time to bust out your glue guns and feathers
and make a fabulous Fancy Turkey Headband. It's not secret that I love making fun and
festive shirts for the holidays and turkey shirts have been some of my favorites.

However, now that I have two girls and I love making bows, I had to make fancy turkeys for
their their hair to go with their awesome shirts. So, last year, I rounded up some supplies I had
on hand and made cute matching headbands the girls could use over the next few years.
I had most of the supplies on hand from various craft projects over the years.
I also lucked out to find a small piece of brown polyester satin in the remnant bin at
Joann Fabric, so the headbands probably cost me about $1.00 in new supplies.
SUPPLIES:
* 1/4 yd Polyester Satin Fabric
*feathers
*googly eyes
*scrap pieces of black and orange felt
*candle
*5/8" fold over elastic
*scissors
* glue gun
STEP ONE
Cut your circles in various sizes. I didn't use a pattern. I just decided how big I wanted
my biggest circle to be and then made each one a little smaller.
I made six circles, but I think it would be cute with eight if you made your biggest
circle a little bit bigger.
STEP TWO
Carefully melt/singe the edges of your circles. You'll want polyester satin fabric because it will
melt. If you happen to end up with a cotton satin fabric, you'll know pretty quick, because it
will just burn. It's not hard to do, but just don't burn yourself!
STEP THREE
Starting with your smallest circle, stack the next biggest circle behind it and glue them together.
Continue until all the circles are glue together from smallest to biggest.
STEP FOUR
Make a little beak out of orange felt and glue it and your googly eyes to the smallest circle.
Such a cute little turkey face!
STEP FIVE
Time for some feathers! You can put as many or as little feathers as you'd like.
I wanted one of each color and arranged them like so. I cut a felt circle that was smaller
than my largest satin circle and glue the feathers to that piece of felt.
STEP SIX
Glue the feathered felt piece to the satin circles, with the feathers sandwiched between the felt
and the satin.Then, cut your fold over elastic to the measurement you need, overlap the edges,
and glue the overlapped edges together and then glue to the felt circle.
Approximate fold over elastic headband sizing:
0-3 months about 14"
3-6 months 14"-16"
6-12 months 16"-18"
12-24 months 18"-20"
2-5 years 20"-21"
5+ years 21"-23"
STEP SEVEN
Cut a smaller piece of felt and glue over your fold over elastic. This gives the elastic a little
more stability and keeps the glued portion from rubbing on your child's head.
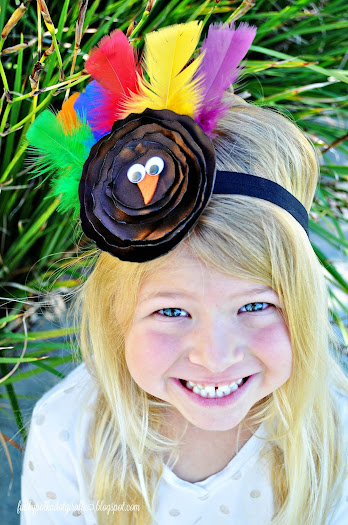
And now you have an adorable Fancy Turkey Headband for your girls to wear!
They have been a big hit wherever we go. I've had several people stop me to take a picture
and I had one mom beg me to make them to sell. So, if you want to be a hit at your Thanksgiving
dinner, grab a polyester satin remnant, some feathers and your glue fun and make your own!
I've always been a fan of "bigger than your face" hair bows and headbands, so these fit my
style perfectly. However, if they are a little too big for you, you could make them on a smaller
scale and I'm sure they would be just as cute . . . maybe . . .
Come on, look at that face, it's adorable, right?
Are you like me? Do you like making themed shirts and accessories for the holidays?
I'd love to see them if you do! Don't forget to link them up to TOO CUTE TUESDAY
so that I can check them out!
I hope you have a fantastic Thanksgiving!
Thanks for stopping by and tell me what you think of my over-the-top headbands!


2 comments:
Post a Comment