FUNKY POLKADOT GIRAFFE

Tuesday, January 26, 2016

Ghoulish Goosebump Movie Cupcakes and Family Movie Night

This shop has been compensated by Collective Bias, Inc. and its advertiser. All opinions are mine alone. #MakeItAMovieNight #CollectiveBias

diet coke cupcakes

We love a good family movie night. It gives the kids something exciting to
look forward to after a long week filled with school, dance, water polo, Cub scouts,
piano lessons and homework. They love taking turns to choose a movie each Friday night,
but sometimes they both unanimously agree on a movie for the family movie night.
When they heard that Goosebumps was being released, they were both on board
for a fun family night with this spooky movie.
 I wanted to make the night special since this is a movie I knew we would all
enjoy and so I headed to Walmart to pick up some supplies.
I have a thing about themes - I really like them. Themes and parties, they just
go together. So sometimes when we have family movie night I want to create
snacks, desserts and maybe even a craft that follows the theme of the movie.
Goosebumps is the perfect theme for a fun family night!

 At Walmart I saw a display that caught my eye - Make it a Move Night!
Perfect! If you buy Orville Redenbacher popcorn, M&M’S® Chocolate Candies,
Coca-Cola, and a Sony Pictures movie in one transaction between 12/22/15-2/2/16, 
snap a picture of your receipt, and visit uploadreceipt.com/movienight
and submit it by 2/9/16 you can get a $10 VUDU credit by mail!
Done! I grabbed all four and headed home to whip up some delicious treats.


First up were some delicious (and ghoulish) Diet Coke Cupcakes.
I love the kick that the Diet Coke gives to the cake and the frosting.
Not only is there a kick with the Diet Coke, but the cake is nice and moist!
I had to add a little bit of green food coloring to make them perfectly Goosbumps
worthy for our family movie night.
If you want to try these yummy cupcakes for yourself, follow the recipe below.


INGREDIENTS

For the cake you'll need:
1 white/vanilla cake mix (I used a french vanilla mix)
1/2 cup butter
2 eggs
1/2 cup buttermilk
1 cup Diet Coke
2 tsp vanilla
green food coloring gel 


For the frosting you'll need:
4 cups powdered sugar
2 cups butter (room temperature)
1 jar marshmallow creme
1/4 cup Diet Coke


INSTRUCTIONS
1.Melt the butter. 
2. Combine the cake mix, butter, eggs, buttermilk, Diet Coke, and vanilla
in a mixing bowl and beat on low for 30 seconds until well combined. Then, beat on
medium for 2 minutes. 
3. Add in the green food coloring gel until it's the perfect ghoulish green.
4. Line two muffin tins with 24 cupcake liners.
(I just happened to have some Halloween liners lefetover!)
5. Fill each liner with about 1/3 cup batter. 
6. Bake for 15-20 minutes at 350 degrees.
7. Let cool in pan for 3-5 minutes and then transfer to a cooling rack to finish cooling.


For the frosting, combine all the ingredients above and mix until well combined.
You may need to add a little bit more of the powdered sugar, depending on how heavy
handed you are with the Diet Coke.
I like to pipe my frosting, so I snipped the corner off a plastic storage bag, inserted my
decorating tip, and piped on the beautiful green frosting. You could just frost with
a knife if that is more your style.


They turned out perfectly and were delicious. I had some gummy zombie hands leftover
from our spooky Halloween dinner, so I added them to a few of the cupcakes just to
put them over the top in the cool department with my kids.
The flavor was fantastic and they were a big hit with everyone.


I couldn't help myself and I popped up some of the Orville Redenbacher movie theater butter
popcorn and made a creepy popcorn cake that I decorated with M&M’S® Chocolate Candies
and some gummy eyeballs. The kids got a big kick out of the creepy cupcakes and popcorn
cake when they got home from school and couldn't wait to watch Goosebumps as a family.


Since we needed to wait for Dad to get home, I gave the kids some construction paper
and paper lunch sacks and had them create their own ventriloquist dummies.
It was such a great activity and it was fun to see their creativity come out.
Isabella was intent on making herself into a ventriloquist dummy and JT wanted
to make a Slappy puppet since he had been him for Halloween.


Do you love having family movie nights? What's your family's favorite movie?
Be sure to check out more fun movie night ideas and be sure to take advantage of the
awesome VUDU offer!

Goosebumps Movie Night

TOO Cute Tuesday: Linky Par-Tay! #269


Are you getting those handmade valentines done?
Did you see the fun Minecraft Valentines I shared last week?
They are perfect for the Creepers and Endermen in you life!

Now onto TOO Cute Tuesday!

What did you make this week that is TOO Cute??
Come link up!

Rules:
  • Must be made by you.
  • Link up to the specific post - not your main blog.
  • No Etsy shops or giveaways please :)
  • Please post the button or link back here so more people can join in the fun.
  • Visit some of the other participants and leave them some LOVE!
TOO Cute Tuesday will be open Tuesday-Saturday.
On Saturday or Monday I'll highlight some of my favorites
and then we'll start over on Tuesday!


This post brought to you by:


I changed the linky party so that the most recently uploaded project will show up as number one. This way everyone gets a chance on top. So, look in the first spot for your project, not at the end. Thanks!!!


Sunday, January 24, 2016

Odysseo by Cavalia Coming Soon to Orange County 2016

Cavalia Orange County

Producers for Odysseo, the new theatrical adventure by the internationally acclaimed 
entertainment company Cavalia, are thrilled to announce Irvine as the host city for the 
Orange County debut of the largest touring production on earth. Odysseo will be presented 
under the White Big Top at the junction of  the I-405 & the SR-133 
with performances beginning Wednesday, February 3, 2016 
under the White Big Top in Irvine  – the largest touring tent on the planet!

Cavalia Orange County

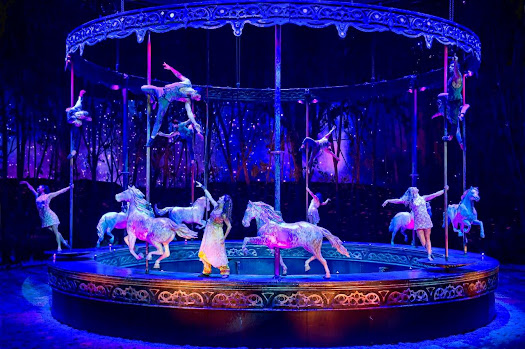
Beginning in a misty, enchanted forest where horses graze and frolic under a sky of rolling clouds and a setting sun, Odysseo takes the audience on a fantastical journey to some of nature’s greatest wonders, from the Mongolian steppes to Monument Valley, from the African savannah to Nordic glaciers, from the Sahara to Easter Island, and even to a lunar landscape, illuminated by shooting stars and brilliant nebulas.

Cavalia Orange County

The horses are the heart and soul of every Odysseo performances. These magnificent animals
play in complicity and with freedom, in a symbiotic and respectful relationship with their
human co-stars, charming and fascinating everyone who has the chance to witness this moving
artistic and emotive partnership.

WHAT
ODYSSEO, the new adventure by Cavalia

WHEN
Opening day is February 3rd with matinee and evening performances
scheduled through February 14th

WHERE
Under the White Big Top in Orange County
at the junction of the I-405 and the SR-133 in Irvine
(on the grounds of the OC Great Park)

TICKETS
Available at www.cavalia.net and by calling 1-866-999-8111
Priced from $29.50 to $269.50 + applicable taxes and fees.

Friday, January 22, 2016

Minecraft Perler Bead Valentines

Minecraft Perler Bead valentines

It's no secret that we love Minecraft at our house. So we decided to mix two things
that we love - Minecraft and perler beads - and create the ultimate handmade
valentine creation last year. I loved these handmade valentines because JT enjoys
making perler bead art, so I wasn't just making 35 Minecraft perler bead hearts
all by myself the night before the Valentine's Day class party.

minecraft valentine

We worked together over the two to three weeks leading up to the Valentine's Day
class party making the cute little pixel hearts. He would put 4-5 together on a
perler bead board and then I would iron them for him. It was fun to have a craft that
we could work together on and spend a little time together to work on them.
 
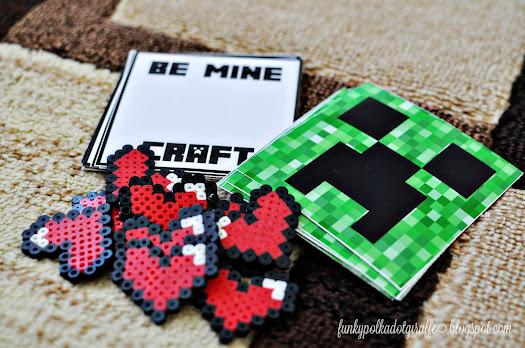
Once we had all the Minecraft life hearts made, then I designed the front and back of
the cards. The back of the card says "Be Minecraft" and I used a fun Minecraft font.
For the front of the card I designed a Minecraft Creeper face. JT was really happy
with how they turned out.


Then I cut the front and back to the same size, used my adhesive tap runner to stick the
two together and then use Glue Dots to stick the perler bead hearts to the valentine.
I print the back of the cards on my home printer, since they were black and white.
For the Creeper side I print them four to a sheet as 8x10 at Costco and they turned
out perfectly.


They were a big hit with his classmates and JT was really happy he had helped to
put them together. A couple of years ago his class had a handmade yard sale of sorts
where the kids could make something and then sell it for class money. JT made a variety
of perler bead designs and made the most at the sale. Ever since then, he had been hooked
on perler beads and they are a great way to spend a rainy afternoon. 


The nice thing about the Minecraft hearts is that they only use three colors of perler beads
and so once you get everything organized, they are really easy to put together. 
In fact, the hearts are so easy that Isabella even made some non-Minecraft perler bead hearts
that I will share next week. 


If you'd like to give some Minecraft health and hearts to your Valentine, then you can
click the link to print your own Minecraft Perler Bead Valentines.
Do you like to make handmade valentines? Where do you find your inspiration?


Wednesday, January 20, 2016

Journaling Book of Mormon Tips and Tricks


Ever since I saw my friend Jacque's Book of Mormon art journal last year, 
I have had scripture study envy.
I love to write and doodle in the margins of my scriptures, but I couldn't find a 
a purchasable version of the Book of Mormon that had the annotations, footnotes, and 
chapter summaries and had wide margins.
There were lots of options for buying a journaling Bibles and so many gorgeous
examples of how to do a journaling Bible, but this year we are studying the
Book of Mormon for Sunday School, I really wanted to do a journaling Book of Mormon.


I'm not as artistically talented as Jacque, so I didn't want to spend the time taking apart
the Book of Mormon and gluing it into sketch books, because I knew I wouldn't be using
any paint or watercolors. But I did want wide margins so that I could write quotes,
draw key words and illustrations and just have a little bit of fun with my scripture study.
So I did a little research last summer and came across these wide margin versions
of all the standards work that was put together by Brad Jackson.
However, I would have to print and bind them and at the time, because I
Primary President in my ward, I didn't have any more brain cells to devote to any other
projects, so I put it to the side and forgot about it.


Then, when I was looking for a way for more meaningful and in-depth study of the
Book of Mormon since we are studying it in Sunday School this year and the theme
for Primary this year is "I Know the Scriptures are True" AND I was released
as Primary President, I knew it was time to get serious about getting my wide margin
Book of Mormon printed, bound and ready for some journaling this year!


I did a little more research and found that Kari over at LDS Lane had used 
Brad Jackson's wide margin Book of Mormon to print journal pages on white
card stock and I knew I needed to dive in and do it. However, I wanted a
bound version, so I took the file to my local print shop and asked if they could print
it up for me on paper that was slightly heavier than regular copy paper.
They print all of our pages for Hero Camp, so they are used to my wild ideas and
big printing jobs. They had it printed for me in less than 24 hours.


So, now I am on my way to a full fledged journaling Book of Mormon and I am loving it.
When I first started at the beginning of the month I was using Papermate InkJoy pens
and the regular pack of 48 Crayola colored pencils. They worked just fine and were a great
starting point for a scripture journaling newbie. I knew I wasn't ready for 
paint or water colors, but I wanted to get just a little bit more sophisticated
 in my technique, so after some more research I have graduated
to Pigma Micron pens (the 005 is my favorite) and some lovely Prismacolor Scholar
colored pencils - they are so smooth! And the Pigma Micron pens don't bleed
through the page, so that is super awesome!


It has been so much to think about what I'm reading, really study it out and what it
means to me and then create something that makes those verses more meaningful.
When I was researching scripture and Bible journaling I remember reading that
you should read the verses, pray about what they meant to you, and ask Heavenly Father
what was important and how you should best express it through your art.
I thought that was great advice. I definitely don't fly through the pages like I did when
I was just reading for time or for pages. In fact, I may spend 3-4 days on a page.
It took me a little bit to be ok with the pace. However, I feel like I know the words
that I've read probably a 1,000 times so much better because of the time I'm devoting to them.


If you're a natural artist - which I am not - the pages will probably go a little more
quickly than I do. I am also trying to read with the kids each night, so that goes
slightly faster than my art journaling, but not much - ha!
I think the important thing is to make it meaningful to you and something
that makes your heart happy and brings you closer to Heavenly Father.
If you want a pre-printed wide margin version of the Book of Mormon, I found one
published by someone name Ben Crowder, but it doesn't have the footnotes or
chapter headings and I love both of those things!

If you decide to join in on the fun,
be sure to share your pages on Instagram and use Kari's
hashtag #bofmjournaling so we can be inspired by one another!


Tuesday, January 19, 2016

TOO Cute Tuesday: Linky Par-Tay! #268

disneyland goats
We haven't had Disneyland passes for awhile now, so I was so sad to hear
that they are taking out the Disneyland goats permanently for the new
Star Wars Land. Don't get me wrong, we are huge Star Wars fans,
and I know that it will be amazing. But I just have so many happy
memories of this "little" guy and visiting the goat-ees at Disneyland
every week because he loved animals so much.

Now onto TOO Cute Tuesday!

What did you make this week that is TOO Cute??
Come link up!

Rules:
  • Must be made by you.
  • Link up to the specific post - not your main blog.
  • No Etsy shops or giveaways please :)
  • Please post the button or link back here so more people can join in the fun.
  • Visit some of the other participants and leave them some LOVE!
TOO Cute Tuesday will be open Tuesday-Saturday.
On Saturday or Monday I'll highlight some of my favorites
and then we'll start over on Tuesday!


This post brought to you by:


I changed the linky party so that the most recently uploaded project will show up as number one. This way everyone gets a chance on top. So, look in the first spot for your project, not at the end. Thanks!!!


Wednesday, January 13, 2016

20 Winter Themed Adult Coloring Pages


I have recently become obsessed with coloring!
It's all the rage right now - especially for adults - and I love it.
We had several rainy days over the last couple of weeks and coloring an
intricate design while listening to the soothing sound of rain outside and sipping
on a delicious cup of Crio Bru and life is good!

So I did some research for you and found 20 free and fabulous
winter coloring pages that you can enjoy during all your rainy (or snowy) winter days.
Grab your favorite colored pencils, or maybe twistable crayons are your thing,
and do some winter adult coloring.
Coloring - it's not just for kids!


15. Star Wars Stormtrooper Coloring Page (because, Star Wars!)


ShareThis

Related Posts with Thumbnails