FUNKY POLKADOT GIRAFFE
Showing posts with label Tutorial. Show all posts

Wednesday, July 25, 2018

Shark Week Shirt Tutorial: Come to the Shark Side #SharkWeek


It's no secret that we love us some Star Wars at this house, but did you also know that we love sharks too? We live for SHARK WEEK and we can't wait each summer to watch this crazy week long celebration of sharks. I don't if it's because we live in Southern California and are avid beach goers or if it's because I wanted to be a Marine Biologist when I was a kid, but the love of the ocean and these mysterious creatures is strong with this family!

So, this year, I decided to really get into the spirit of SHARK WEEK and create a fun t-shirt design to commemorate the week. I combined our love of Star Wars with our love of SHARK WEEK and the COME TO THE SHARK SIDE t-shirt design was born!


{CUTTING THE DESIGN}
I created the design in Photoshop and then saved it as a format that could be used by my Silhouette SD machine. Yes! I still have the Silhouetted SD. Maybe one day I'll get upgraded to the Silhouette Cameo. If you're listening Silhouette America - I am open to sponsorship! Hee, hee! 

I like to do a cut of the design in paper first to make sure I like how the size and dimensions work on the shirt I'm working with. It helps me to get a visual of the design on the shirt and make sure that the cut design translates well to a vinyl iron-on image.

Then, before you cut your vinyl design, make sure that you have flipped it to MIRROR IMAGE or backwards so that the words are facing the right way when you iron it on. You'll load the heat transfer vinyl with the clear plastic backing down. I always use a mat, but with the HTV you don't have to.

Set your blade and cut settings to the type of material you are using. You don't want it to cut through the clear plastic backing, because after you weed your design (or remove all the extra vinyl from around the design), you want your design to be stuck to the clear film so you can flip it and iron it onto your shirt.


{WEED AND IRON ON}
Once it's all cut, it's time to weed! Once all the extra vinyl is weeded (or removed), then you iron it on! TIP: To make sure I get the design centered on the shirt, I fold the shirt in half and iron a crease into the shirt. Follow the directions on the HTV product for how long to iron and such. Then, get to ironing!


{WEAR AND ENJOY}
I think this would be super cute on a tote bag, but Grace is loving it as a super cool shark shirt. She insisted on having her diving sharks in the the picture too, so they hitched a ride in her pockets. I hope you enjoy SHARK WEEK and this t-shirt design. 


DO YOU LOVE SHARK WEEK? HOW DO YOU CELEBRATE?


Thursday, March 1, 2018

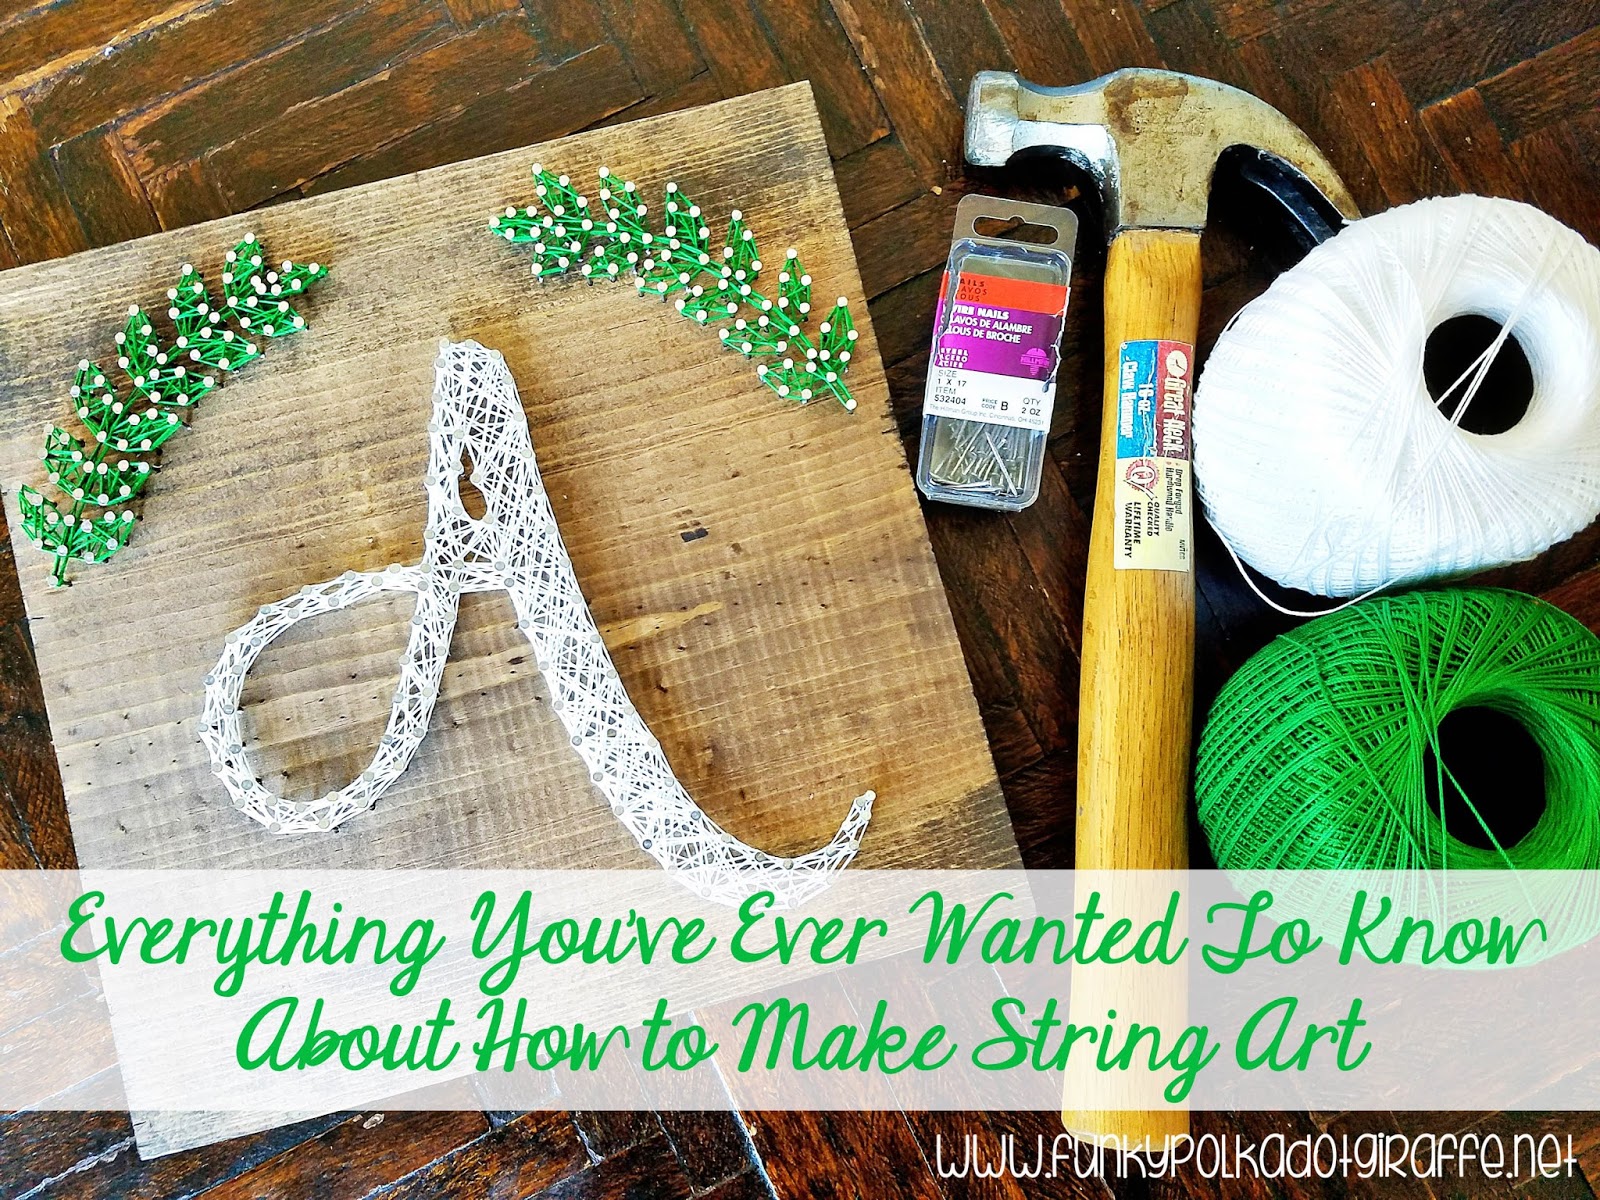
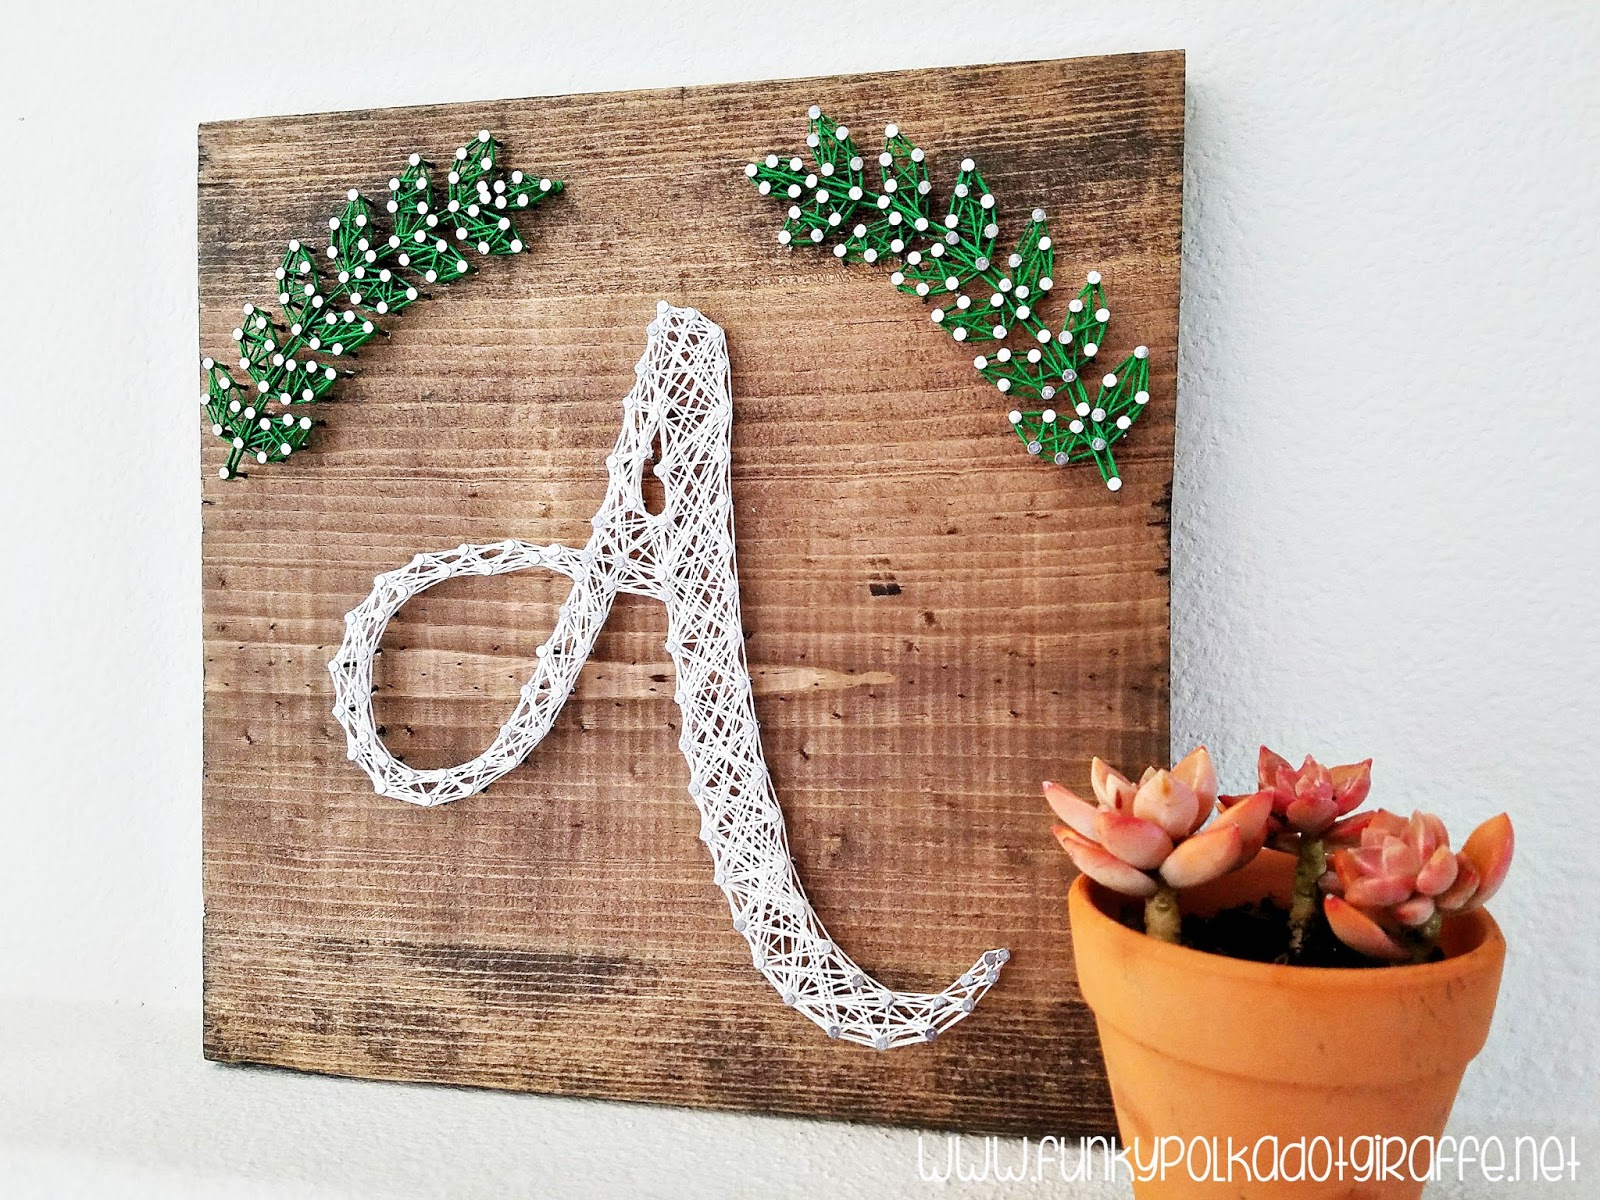
Everything You've Ever Wanted to Know About How to Make String Art

So I ventured into the realm of string art projects recently and I'm hooked. I'm constantly scouring Pinterest looking for more cute designs and ideas - and there are so many. When I started looking into making my own string art I had so many questions!


What kind of nails do I use?
What kind of wood? How thick is the wood?
What string do I use? How do I start it?
How do I finish it? How close should my nails be together?

So many questions!

And I either found them or figured them out on my own, but it took a good couple of days to pull it all together. So, I decided to share my first project with you and give you all the answers to my questions in the hopes that it will help you if you decide to delve into amazingness of string art projects.

Also, I'll be honest, this is a labor intensive craft. It takes a lot of time to hammer in the nails - so many nails! So, don't expect to sit down and bang this out in 30 minutes - pun intended :D But I still think it's fun! OK, let's get started!


{WHAT KIND OF WOOD SHOULD I USE?}
I've worked a little with wood, but most of the time someone else got it all prepped and ready for me. So, when I went to Lowe's to find wood for this project I was so overwhelmed with all of the choices! I called in a life line and Marco Polo'd my wood genius friend Chelsea. She talked me through the choices and brought me down from my ledge. I chose a 1-inch WHITEWOOD BOARD that was 12in x 4ft and then Chelsea cut them down to 12x12 boards for our project.


{WHAT KIND OF NAILS SHOULD I USE?}
I made the mistake of asking the guy at Lowe's and told him what I was making. He was all - "Oh yeah, lots of people have been in to get stuff for that. I know exactly what you need." He did not know. He tried to sell me on some roofing nails. They were too bulky and clunky for my liking and they didn't come in silver. No thanks. So I thanked him for his help and kept looking. I settled on 1x17 WIRE NAILS for the project. The "1" is for the length of the nail and the "17" is for the gauge of the nail size. They were the perfect size and color! They even have them in a gold tone if that's the look you are going for with your string art. For this project I used TWO BOXES OF 2OZ NAILS. How many boxes you'll need will depend on your design.


{WHAT KIND OF STRING DO I USE?}
I think that the CLASSIC 10 CROCHET THREAD is perfect for string art and that is what I used. However, you get a wider range of color choices if you use embroidery floss. If you use embroidery floss, you'll probably want to use all 6 strands to get the bulk that you get with the crochet thread.


{HOW CLOSE TOGETHER SHOULD I PUT MY NAILS?}
I like my nails A HALF INCH APART- give or take. There were some spots where it ended up a little bit more and a little bit less to preserve the curve of the design. If they are too far apart you won't get all the cool criss-crossing and if they are too close you won't be able to get the string on the nails. So those are my thoughts on nails.


{WHERE DO I START?}
Let's start at the very beginning, a very good place to start . . . hee, hee! 

{1} STAIN OR PAINT YOUR BOARD
{2} TAPE DOWN YOUR PATTERN
{3} MARK YOUR HOLES FOR YOUR NAILS
{4} START HAMMERING!

You actually have several options for making your pattern.
You can print it out on the printer and mark your nails every half inch and nail straight into the paper.

Or you can make a template on the Silhouette and mark where your nails go and then start nailing.

Or you can get really fancy and mark your holes around your template and then PRE-DRILL your holes. This makes the hammering go SO MUCH FASTER! I didn't pre-drill my holes and my friend Chelsea did and she was done lickety split with the hammering.


{NOW WHAT?}
After you've got all your nails in, be sure to pull off your paper pattern! Seriously, I got so excited about making my leaves that I started doing the string before I  took the paper off. I had to take all the string off and start again. So, if you nail right into your paper template, be sure you remove it BEFORE you start the string.

Then, start stringing! You TIE A KNOT on one nail and then start stringing. I wanted an OUTLINE on my letter, so I did the OUTLINE FIRST and then went back in and filled in the inside. To get the outline you go on the outside of the nail and then on the inside of the nail. This gives it a bold outline. When I started filling it in, there was no rhyme and reason to my stringing pattern.  I just did it until I thought it looked like I wanted it to look.

Another BIG TIP is to KEEP THE STRING TIGHT as you make your pattern. I didn't just go around the back of the nail, I went all the way around the nail most of the time so that it was more secure and wouldn't come undone if I let go for a second.


{HOW DO I FINISH?}
You finish the way you start by tying a knot on the last nail. You can tuck the string tail up into the string pattern or you can secure it with a little dab of glue. And now you're done!

There are all my tips for making sting art. I hope it helps you get started and create something amazing. Please let me know if you have any other questions or need any help!

To sum it all up:
1" thick whitewood board
1x17 wire nails
Classic 10 crochet thread
nails about a half in apart

The font I used for my "A" is Magnolia Sky, but I think Janda Elegant Handwriting would be fabulous too! The pattern for the leaves is below! Enjoy and I'd love to see what you make!


Friday, October 13, 2017

DIY LEGO Halloween Earrings Tutorial


We're headed to LEGOLAND Brick-or-Treat this weekend and I wanted something fun and festive to wear. I'm not really a t-shirt person, so I decided to make some fun earrings that would be spooky and totally LEGO themed. So, I rummaged through our giant bucket of LEGO pieces and grabbed all the bricks that seemed in anyway related to Halloween. Shhh . . . don't tell the kids!


I found a lot of fun pieces - including the eyes from the Mixels and some spiders. Then I gathered up my jewelry findings and got to work putting together my LEGO Halloween earrings.


If you're brave, you can use super glue (aka THE KRAGLE) to keep your pieces permanently stuck together. However, I liked the idea of being able to change the earrings up every now and then, so I decided against using The Kragle and just put them together. LEGOs lock tight, so I'm not worried about the pieces falling off.


Now, to turn the LEGO plates into earrings and attach the findings, you're going to need to put a little hole in the top LEGO for the jump ring to connect through. There are various ways to put a hole in a LEGO. The best way is to use a drill with a tiny drill bit and zip - you're through the LEGO with no problem. If you don't have a household drill (or yours isn't charged like mine . . .) you can heat up a needle with a flame and punch it straight through. The hole might be too small, so move it around a little bit to get the hole big enough for the jump ring to go through.


Now you're done! Put your jump ring through the hole you've created, attach your earring finding, close up the jump ring with pliers and you are good to go! You have your totally original LEGO Halloween earrings and are ready to rock it at Brick-or-Treat or anywhere else you need a great Halloween accessory to complete your outfit.


You might have to make two pairs if your daughter also things they are super cool. Good thing we have lots of LEGOs we can use to make lots of different LEGO Halloween earrings. If you make some Halloween earrings I would love to see them. 


Have you ever made jewelry with LEGOs? What did you make?


Wednesday, February 15, 2017

Sick Day Survival Kit & Target Gift Card {GIVEAWAY} #SickJustGotReal

Disclosure: This post has been sponsored by Pfizer Consumer Healthcare and 20th Century Fox. All thoughts and reviews are my own.

Sick days aren't fun for anyone. The person sick is miserable and the rest of the
family is grounded to the house because you can't go out and leave a man down.
And mom is crossing her fingers that nobody else gets it - especially her -
because when mom's sick, she still has to carry on and take care of everyone else.
Sick days are the worst!


However, when one of us is sick, we definitely have a go-to set of sick day
survival kit basics that I try to keep on hand when the sickies hit. We've had
more sick days than I'd like to count this year and it's only February! So I'm
really thankful that Pfizer Pediatric makes products that offer symptom relief
for kids as young as 2 and up to 11. That is exactly our age range at home. 

Children’s Advil® is perfect for Grace. Its comes in several great-tasting
flavors, including Sugar-free Dye-free Berry, Bubble Gum, Grape, Blue
Raspberry, Fruit and Dye-Free White Grape flavors. She loves Grape and I
appreciate that it alleviates the achy body feeling she gets when she's sick.


We use Children’s Dimetapp® Cold and Cough to tackle the most
 bothersome stuffy and runny noses, all while working to relieve a cough, for
ages 6 and up and the big kids like the yummy grape flavor.

Other items I keep in my Sick Day Survival Kit are:
  • Peppermint candies to soothe dry throats
  • Saline nasal spray
  • Tissues
  • Moist saline wipes
  • Lip balm
  • Thermometer
  • Cozy corn bag  
And we definitely keep favorite funny movies on hand to keep our spirits up
while we battle the sickies. 20th Century Fox's The Sandlot is a family
favorite and I quote it to the kids almost daily. I mean it has James Early Jones
in it, how can you go wrong? If you haven't seen it, I highly recommend adding
it to your family movie library.


Right now you can get 10% off Pfizer Pediatric products and
select 20th Century Fox DVDs at Target through February 20, 2017, with the
Target  Cartwheel app. With the Cartwheel coupons for Pfizer Pediatric Products,
and 20th Century Fox DVDs you can stock your Sick Day Survival Kit so your
kids can start feeling better fast!

{{GIVEAWAY}}

And because I like you all so much I am giving away a Sick Day Survival Kit to
get you started! Yay! Be sure to enter below!

You will win (1) $25 Target gift card, Pfizer Pediatric products 
(Children’s Advil® Suspension, Grape, Children’s Robitussin® Cough & Chest 
Congestion, Children’s Dimetapp® Cough and Cold) and (1) 20th Century Fox
DVD (Ice Age: Collision Course, The Sandlot, The Peanuts Movie).


Saturday, December 3, 2016

Gingerbread Girl Purse {Tutorial}

Last year My super talented mother-in-law and her sweet mom (Grandma Sweetie)
made the girls the cutest gingerbread men beanies. Winter has hit Southern California
(think a chilly 60 degrees) and we recently pulled out the cute gingerbread hats for
carpool mornings and later afternoons at the park. Since Grace loves purses and
carrying all her necessities (think Shopkins and ponies) around with her, I decided to
make her a cute Gingerbread Girl Purse to match.


The Gingerbread Girl Purse is made of soft fleece, a bit of felt, rick rack, some ribbon
and cotton print fabric. The tote purse took about an hour to put together. However, if
you don't have sewing ADHD, because you're trying to binge watch  
Gilmore Girls: A Year in the Life or a spitfire toddler demanding your attention,
then you could finish it even faster.

{SUPPLIES}

  • 2 pieces of brown fleece cut to 9"x11"
  • 2 pieces red cotton fabric cut to 9"x11"
  • 2 pieces of 5/8" white ribbon cut 16" long
  • scraps of black and red felt for eyes, cheeks, bow {optional}
  • white ric-rac (about 12")
  • scissors
  • sewing machine
  • pins
  • basting adhesive {optional}

{DIRECTIONS}

I cut my two pieces of brown fleece to 9"x11" and cut the pieces for my gingerbread
girl's face. Then, I laid them out  to see how I wanted to them to fit. I just eyeballed my
eyes and cheeks by free-hand cutting circles out of a scrap of felt. I used glitter felt for
the cheeks because I like the pop it added. Once I adjusted the size of the eyes and
cheeks, and figured out how much ric-rac I needed for the frosting stripe and the
mouth, I got to sewing!


First, I sewed the frosting stripe and the mouth onto the brown fleece with a zigzag stitch.
Just go slow and adjust as needed. I did pin the ric-rac down as best as I could, but it
definitely was a bit tricky. I didn't mind if it wasn't perfect, but I wanted it pretty close.
Also, make sure the ric-rac doesn't get too close to the top or bottom. This way it
doesn't get swallowed up in the seam allowance when you start putting the bag together.


Next, I put the cheeks on. Instead of using pins, I used some basting adhesive. Again, I
used a zigzag stitch to put the cheeks on. For the eyes, I sewed a couple of "X"s to make
them look like buttons. If you want to use large black buttons instead - you can. I didn't
for two reason: {1} I didn't have any that were big enough and {2} Since I am making
this for a little girl, I didn't want to create a choking hazard.


Once your face is all sewn on, then you can make a little felt bow if your gingerbread
purse is a girl like mine. I took another scrap of felt about 3"x4", folded it in half and
sewed the open edge. Then, I flipped it right side out and sewed up the open edges.
I took another little scrap and made a middle piece, scrunched up the bow in the middle
and hand sewed the middle piece to secure it and make a cute bow. It's a lot
like the bow I made for the Corn Heating Bag.


Now, we're ready to sew the bag! Put your two fleece 9"x11" pieces with right sides
together and sew together with 3/8" seam allowance on three sides, leaving the top open.
Repeat this process with the two red pieces of cotton fabric. Then, since I like the
square/boxy look on a purse, I pinch and flatten the corners and sew across about 3/8"
from the tip. If you need a better visual, I used the same technique for
my Harry Potter tote bag.


It's so adorable!!! Time to put the liner and the outside of the bag together.
I didn't put the bow on until the very end, it's just on there right now to see how it
will looked finished.

You'll need your two pieces of 16" ribbon as we are going to make them into handles
for the purse. This part is tricky and you'll end up with your  bag sewn together wrong
(believe me I've done it!) if you don't slow down and double check that you've got
it put together right.

Take the outside of your bag (your fleece gingerbread face piece) and turn it
WRONG SIDE OUT. Take your red lining piece and turn it RIGHT SIDE OUT and
slip it inside your fleece gingerbread face piece. Now, the RIGHT SIDES will be together
on the INSIDE of your bag and your WRONG SIDES will be visible on the inside and
outside of the bag. Pin the side seams and then tuck your ribbon handle pieces in
between the RIGHT SIDES together and pin about 1" from the side seams.

Then pin all the way around - being sure to leave a 3-4" opening for turning.
I mark my start and stop with blue pins so I don't accidentally sew the bag closed.
Sew from START to STOP point (being sure to leave the opening!) with a
3/8" seam allowance.


Time to flip it! Through the opening you left, pull your RIGHT SIDES out.
You're almost done. Tuck the lining back into the bag and sew the hole you left
for turning closed. You can sew all the way around and make a nice finished looking
topstitch, but I didn't do that for this bag.


Now is the perfect time to either sew or glue your felt bow on. You can use
grosgrain ribbon if you want something less bulky. I like how the felt looks with the
fleece and it's sparkly! Now I want to make some more little purses for all the little
girls that I know. Then they can all be twinners at park playdates.


We're very glad that the 90 degrees of October are gone and can finally wear our cute
winter clothes. Grace insisted that we add the yellow flower to her gingerbread man
hat to make it girl like her purse. I need to make a red bow so the purse and the hat
can be twinners too! Happy sewing!


This post was originally published at Skip to My Lou on November 13, 2016.


Monday, November 14, 2016

Bake, Craft, Sew {2016} at Skip to my Lou!

The Bake, Craft, Sew series is back for 2016 at Skip to My Lou and today I'm guest
posting and sharing how to make this adorable Gingerbread Purse. It's the perfect size
for the little girl in your life and it's super easy to put together. While you're there
check out the other fun gifts that you sew this holiday season!


Friday, September 30, 2016

Altered Composition Notebook: General Conference Journal {Mini} Tutorial


So, I got this last minute idea to make a General Conference notebook for the girls I
visit teach as a gift for LDS General Conference - which starts tomorrow - and I thought
I'd share a little mini-tutorial on how I made it. In non-Mormon speak, I thought I'd make
a cute journal for the girls from church I visit each month to take notes in while they watch
our church-wide broadcast this weekend. We love General Conference because it means
we stay home in our jammies and watch church on TV. Awesome, right?

I gathered up the supplies - which I had at home - and got to work. If you want to make
one, you will need . . . 

{ALTERED COMPOSITION NOTEBOOK SUPPLIES}
composition notebook
strong adhesive
scissors
tape 
washi tape
1 piece 12x12 scrapbook paper cut to 6x12 for large cover
1 piece 6x12 scrapbook paper for the binding
2 pieces scrapbook paper cut to 7 1/4 x 9 1/2 for the inside
ribbon or other embellishment
chipboard letters
black pen
bone folder

I covered the outside of notebook with my paper and glued it on really well with
permanent tape adhesive. It was really easy.

1. Take your piece of 12x12 paper that you cut to 6x12 and glue it to both sides of the
notebook - leaving an edge for folder over and gluing on the inside of the notebook.
Use your bone folder to get a good clean edge and clip your corner.
 I don't have a bone folder, so I used a Pampered Chef pan scrapper and it worked
just as well.


2. Take your 6x12 for the binding edge (mine is pink) and work it over the edge of a
table so that it is slightly bent and is the shape of the binding. Glue it to your notebook
while it is CLOSED - being careful to make sure there is an equal amount of paper
on each side of the cover. Cut in the middle and fold and glue in the leftover to
the inside.


3. Glue the 7 1/4 x 9 1/2 inch papers to the inside of the cover to cover up your work
and make it look all nice and pretty.


4. Cut a piece of ribbon to wrap around the front notebook cover and glue it down for
embellishment. Or use another piece of paper for embellishment.

5. Glue on your chipboard letters and hand write or print out your words
and add them to the cover. It's really up to you!

At this point, you could use the altered notebook for whatever you want! If you want
to make it a General Conference Journal, then keep reading! You'll want to print off

Next, I laminated them and them taped them in with regular clear tape down the edges
of my notebook. I fit 6 tabs going down and I taped on both sides of the page to make
sure they would stay put. I put 4 pages for each person, which used 60 of my 100 pages.


With the other 40 pages I left space for all the other speakers. I wanted the pages to be 
fancy, so I added washi tape to the edges and it looks awesome! I want to washi all
my other journals and books now!

A quick and adorable gift! Be sure to make one for yourself!


ShareThis

Related Posts with Thumbnails