

Hooray! It's that time of year when Marissa at Rae Gun Ramblings runs her
Happy Harry Potter series to celebrate the days leading up to Harry's birthday on
July 31st! I'm so excited to be participating again this year. It's no secret that we love
Harry Potter and I can't wait to share with you my tutorial for this adorable
Harry Potter Tote Bag!
(Be sure to go read to the end of the post to enter an awesome Harry Potter
prize pack giveaway!)
Happy Harry Potter series to celebrate the days leading up to Harry's birthday on
July 31st! I'm so excited to be participating again this year. It's no secret that we love
Harry Potter and I can't wait to share with you my tutorial for this adorable
Harry Potter Tote Bag!
(Be sure to go read to the end of the post to enter an awesome Harry Potter
prize pack giveaway!)
To make this Harry Potter tote bag you will need:
Rotary cutter
sewing machine
Peach/beige fabric
Hogwarts red and gold/yellow fabric
black fabric
Harry Potter Glasses template
Heat n' Bond Lite
For the body of the bag, you'll need fabric cut in the following
colors and dimensions:
Beige/Peach fabric
2 pieces - 18x14
Black Fabric
1 piece - 8x14
1 piece - 3x14
1 piece - 8-9x14
1 piece 4x15
Red fabric
1 piece - 10.5x18
4 pieces - 2.25x7
Yellow/Gold fabric
1 piece - 6.5x14
5 pieces - 2.25x7
2 pieces - 18x14
Black Fabric
1 piece - 8x14
1 piece - 3x14
1 piece - 8-9x14
1 piece 4x15
Red fabric
1 piece - 10.5x18
4 pieces - 2.25x7
Yellow/Gold fabric
1 piece - 6.5x14
5 pieces - 2.25x7
Ok, now that you have all your fabric cut for the body of the bag,
let's put Harry's face together!
let's put Harry's face together!

1. Take your red and yellow 2.25"x7" pieces and sew them together with a 1/2" seam
allowance, alternating red and yellow to make Harry's scarf. I goofed on this part and only
made my piece 4" long, but didn't realize it until they were all sewed together. I didn't
want to start over again, so I did what Tim Gunn says to do and made it work!
2. Fold under a 1/4" on each long side and iron. Then pin to your bag. I bumped my
scarf up 1.5" from the bottom, because the bag will "eat" that much when put together.
You won't need to do that because you will have made your pieces the right size!
Sew the scarf to the bag piece as close to the edge as you can. I call this a topstitch.

3. For Harry's hair, take your 8x14" piece of black piece of fabric and adhere a piece of
Heat'n'Bond Lite to the wrong side per the package instructions. Sketch out what
Harry's hair looks like to yours on the paper side, cut along your sketch lines, and then
adhere the hair fabric to your bag piece per package instructions. Edge stitch along the
jaggedy edges of the hair. You don't need to do the top or sides since you used Heat'n'Bond
and the other sides will be part of the seam allowance when you put the bag together.

4. For Harry's glasses take your 4"x15" piece of place fabric and adhere another piece
of Heat'n'Bond to the wrong side of the fabric. Pin the glasses template to the fabric
and cut out. Adhere the glasses to the bag body piece and then edge stitch to secure
the glasses to the bag.
Don't forget to use the template to stitch on Harry's scar! I used pink thread with a
red bobbin and I love how it turned out.
Don't forget to use the template to stitch on Harry's scar! I used pink thread with a
red bobbin and I love how it turned out.
Yay! Harry's face is done!

5. For the back of the bag, you can do a solid piece, but I wanted to change it up and
do a blocked piece. So, I took my yellow 6.5"x14 piece, black 3"x14" piece and
red 10.5"x14 piece and sewed them together to make a more interesting back piece.
6. Now all your pieces are ready to put together into a bag! Put the Harry Potter face
and blocked back with right sides together, pin, and sew with a 3/8" seam allowance
on three sides, leaving the top open. Repeat with your interior lining pieces - one black
and one beige piece 18"x14".

7. Pinch and flatten the corners of each "bag" and sew a line 1 1/2" from the
point to create a boxy bottom.
Now for the fun scrappy straps!

8. For your straps you can just take 2 pieces of fabric that are 5"x26" or you can make
them scrappy and fun by piecing together different sized blocks. I cut 2 sets of pieces
that were 5" wide and varied length from 3"-6" and sewed them together.
them scrappy and fun by piecing together different sized blocks. I cut 2 sets of pieces
that were 5" wide and varied length from 3"-6" and sewed them together.

9. Then, take your scrappy strap pieces and iron them in half with wrong sides together.
Next, open up and iron each side into the middle creaseyou create. Fold over and iron
closed do you don't have any exposed seams.

10. Now that your straps are all iron and pretty, edge stitch down both long sides and
you've got fun scrappy straps for your Harry Potter bag.
Time to put the bag together!

you've got fun scrappy straps for your Harry Potter bag.
Time to put the bag together!

11. Turn your interior lining piece right sides out and slip it inside your piano/lyrics
exterior fabric so that the right sides are together.
12. Pin your straps in between the right sides about 2.5" from the sides of the bag.
13. Sew up the top of the bag with a .5" seam allowance, making sure
to leave a 2"-3" opening for turning the bag right side out.
14. Turn your bag right side out and then push the lining into the bag and top stitch
around the bag to make it looked finished and close up the hole you left for turning.
around the bag to make it looked finished and close up the hole you left for turning.


I love how it turned out! Thank so much for joining me! Be sure to check out my other
tutorials and recipes and come back again to see what's new!
In addition to the awesome Happy Harry Potter posts by over 50 bloggers,
Marissa is running TWO awesome Harry Potter giveaways! You can enter
Harry Potter Giveaway #2 below! And head over to Rae Gun Ramblings to enter
the the other giveaway! Good luck!
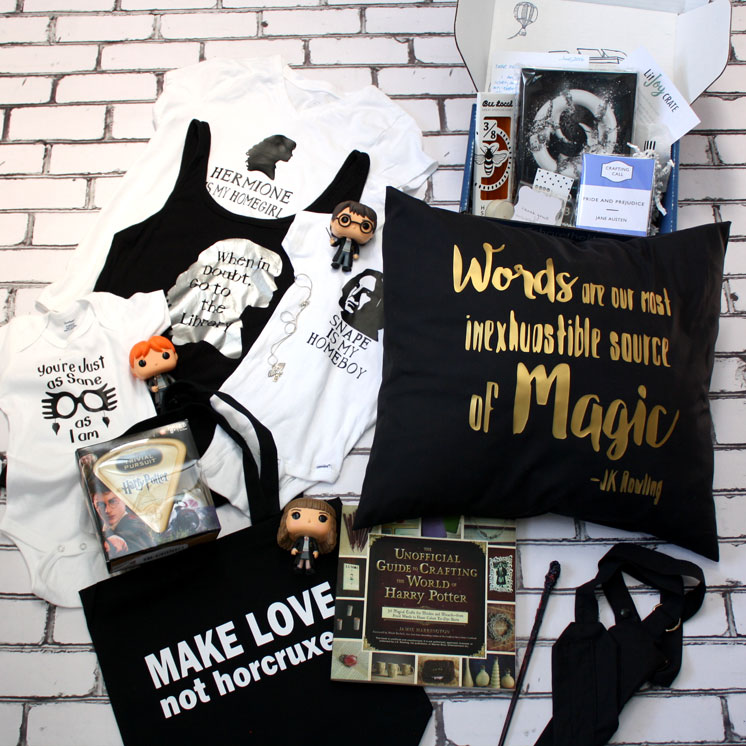
Prize Pack #2
See more about each prize and sponsor at this giveaway post and be sure to enter the
other equally awesome prize pack while you're there!
Winner must have a US address or be willing to pay for international shipping.
See more about each prize and sponsor at this giveaway post and be sure to enter the
other equally awesome prize pack while you're there!
Winner must have a US address or be willing to pay for international shipping.
- Black Wand Holster and Magic Wand (toddler, child, and adult sizes available)
- Character Shirt (Choice of Snape, Hermione, or Luna)
- Make Love Book Bag
- Words are Magic Quote Pillow
- The Unofficial Guide to Crafting the World of Harry Potter
- Personalized Hogwarts Acceptance Letter
- World of Harry Potter Trivial Pursuit
- One Dozen Harry Potter Cookies
- Hedwig Owl Post Necklace
- Lit Joy Crate June Box
- Harry Potter Character Funko of Choice (restrictions apply)
- 10$ Worth of Harry Potter Art Prints
- Classic Maillot Swimsuit SEWING PATTERN


